Wir verwenden Cookies, um Ihnen ein individuelles und reibungsloses Erlebnis zu bieten. Wenn Sie diese Website besuchen, stimmen Sie unserer Verwendung von Cookies zu. Wenn Sie es vorziehen, keine Cookies zu akzeptieren oder weitere Informationen benötigen, lesen Sie bitte unsere Datenschutzerklärung.
Fallls Sie wissen, in welche Kategorie Ihre Frage gehört, können Sie hier die Kategorie der häufig gestellten Fragen auswählen. Katalog:
Ergebnisse:
Q (Q&A-152|488):
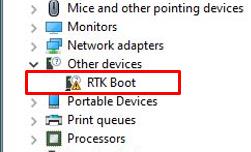
Ich habe ein TRX40-Mainboard. Im Gerätemanager befindet sich ein RTK-Boot-Gerät, das mit einem Ausrufezeichen angezeigt wird und es gibt keine Tonausgabe über den Audioanschluss. Was kann ich tun, um dieses Problem zu beheben?(2020/4/1)
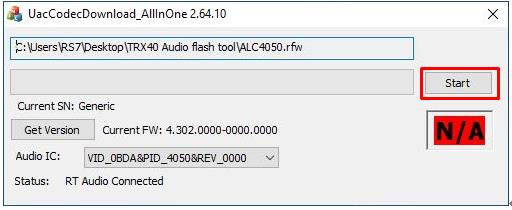
A:Wenn im Gerätemanager ein RTK-Boot-Gerät angezeigt wird und der Audio-Port nicht verwendet werden kann, befolgen Sie bitte die folgenden Schritte, um das RTK-Boot-Gerät zu entfernen und die Audioausgabe ordnungsgemäß einzurichten.
Schritt 3. Klicken Sie mit der rechten Maustaste auf das Startsymbol auf dem Desktop und wählen Sie den Gerätemanager, um zu sehen, ob in Ihrem System RTK Boot angezeigt wird.
Schritt 5. Doppelklicken Sie auf UacCodecDownload_AllInOne_RsProxy_2.64.10
Schritt 6. Drücken Sie auf Start, um das Flashen der Audio-Firmware zu starten.
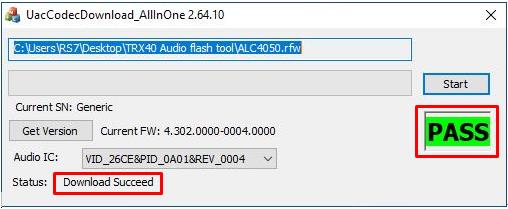
Schritt 7. Sobald der Flash-Prozess abgeschlossen ist, zeigt das Tool PASS an, was bedeutet, dass die Audio Firmware erfolgreich geflasht wurde und kein RTK-Bootgerät mehr im Gerätemanager angezeigt werden sollte.
Q (Q&A-151|487):
Wenn ich in Windows 10 1909 über das Mikrofon aufnehme, höre ich zischende Geräusche in den Aufnahmen.(2020/1/1)
A:Wenn Zischgeräusche in Aufnahmen zu hören sind, wählen Sie bitte eine der folgenden Methoden, um diese zu vermeiden.
Methode 1:
Schritt 1.
Laden Sie den Realtek High-Definition-Audiotreiber von der ASRock-Website herunter.
*Bitte stellen Sie sicher, dass Ihr LAN-Kabel angeschlossen ist, wenn Sie den Realtek-Audiotreiber installieren.
Schritt 2:
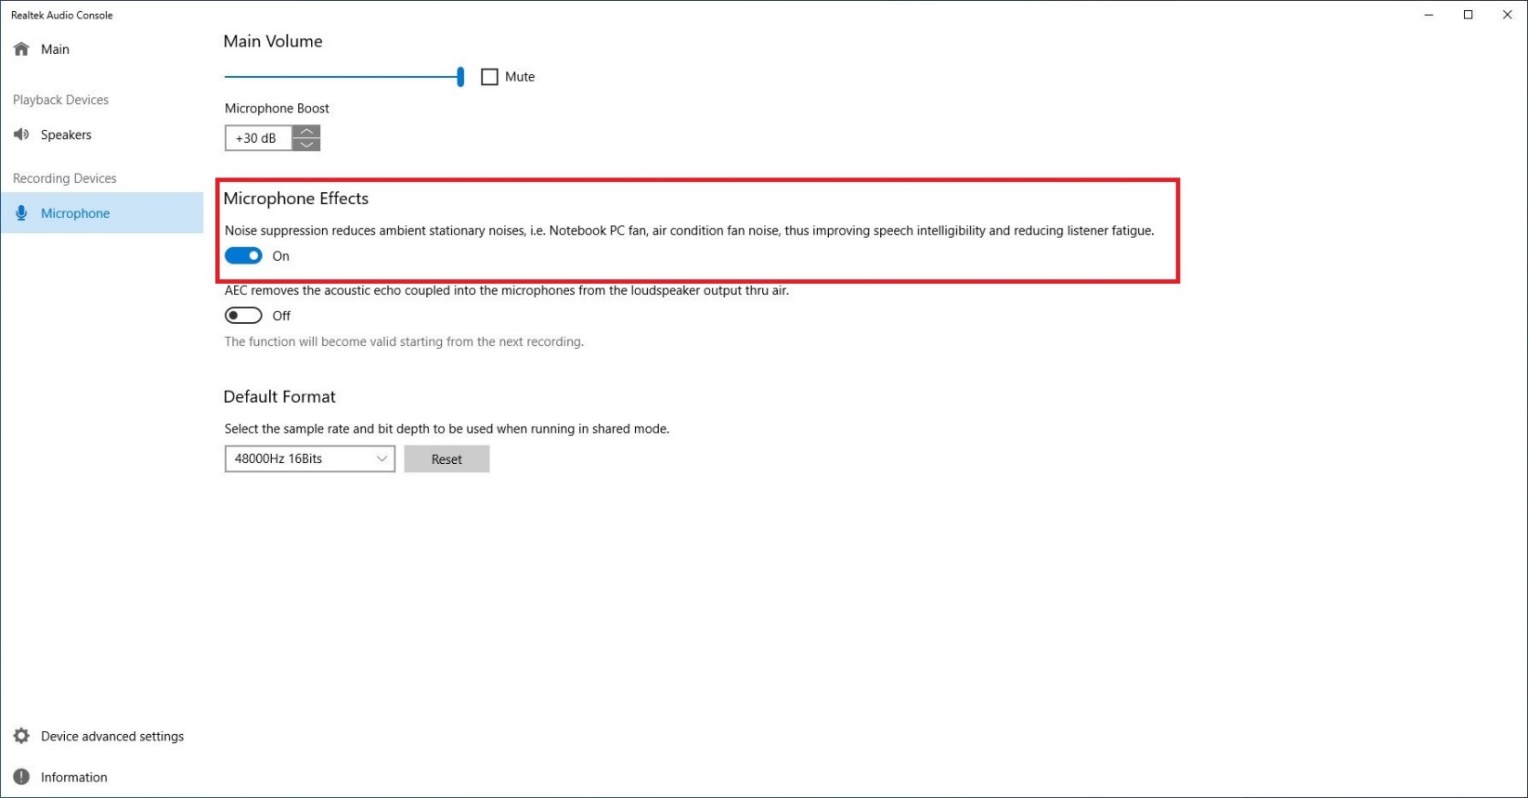
Öffnen sie die "Realtek Audio Konsole”.
Schritt 3.
Aktivieren Sie die Option "Noise suppression reduces ambient stationary noises” in der Realtek Audio-Konsole APP.
Schritt 4.
Sobald die obige Einstellung aktiviert ist, wird die Aufnahmequalität verbessert.
Methode 2:
Schritt 1.
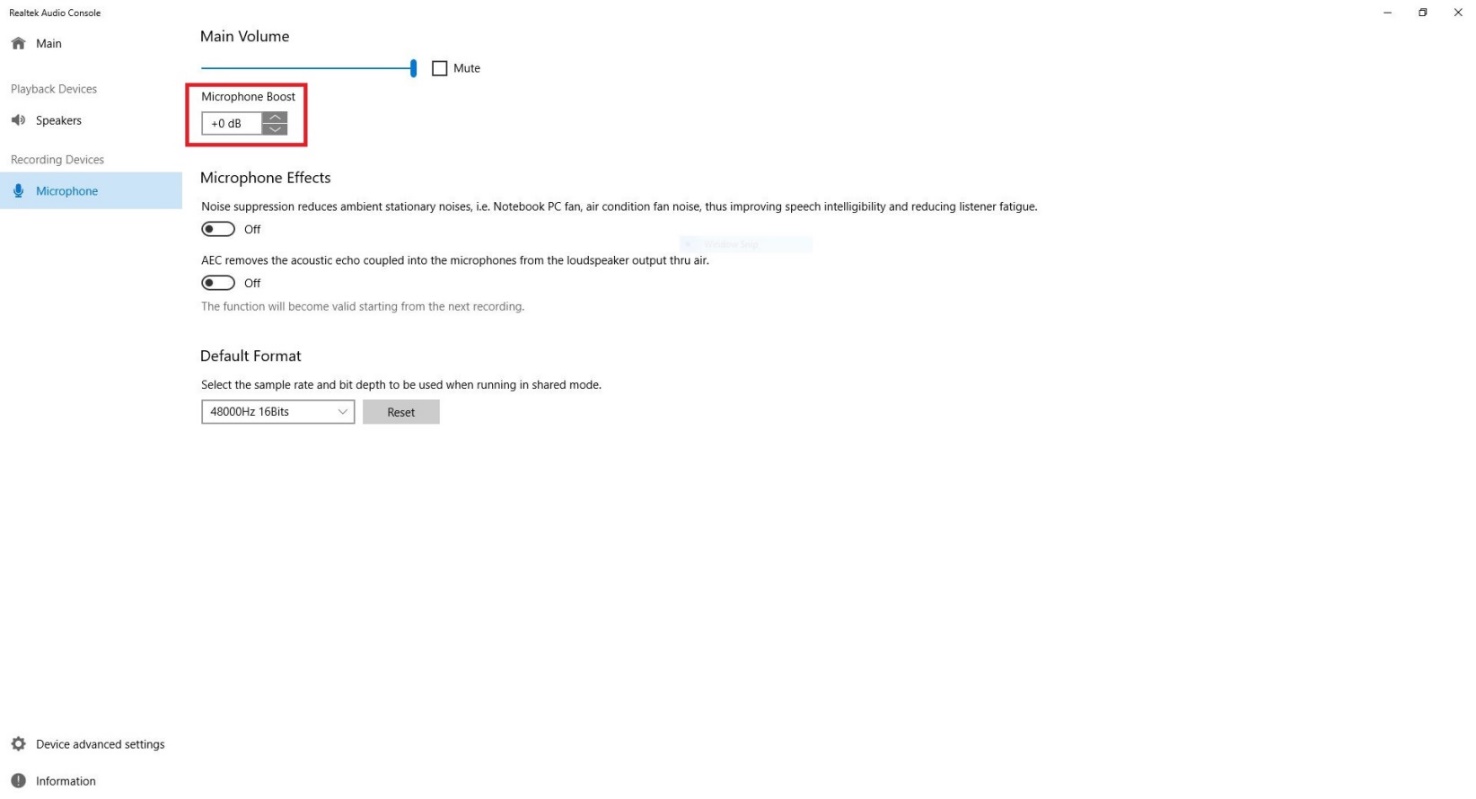
Siehe Schritt 1 und Schritt 2 von Methode 1, um die "Realtek Audio Konsole" zu öffnen.
Schritt 2.
Stellen Sie die Mikrofonverstärkung auf +0db ein.
Schritt 3.
Sobald der Boost-Wert auf +0db eingestellt ist, wird die Aufnahmequalität verbessert.
Q (Q&A-142|468):
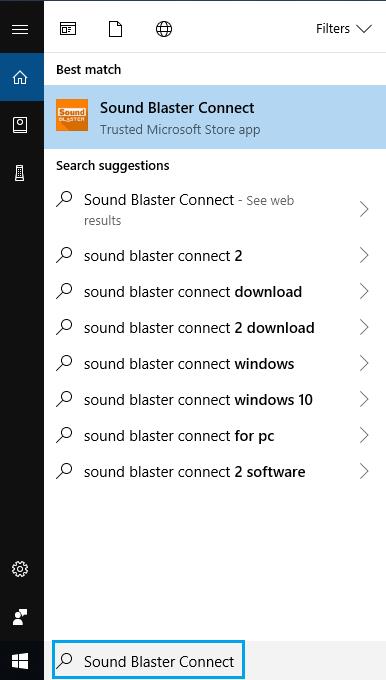
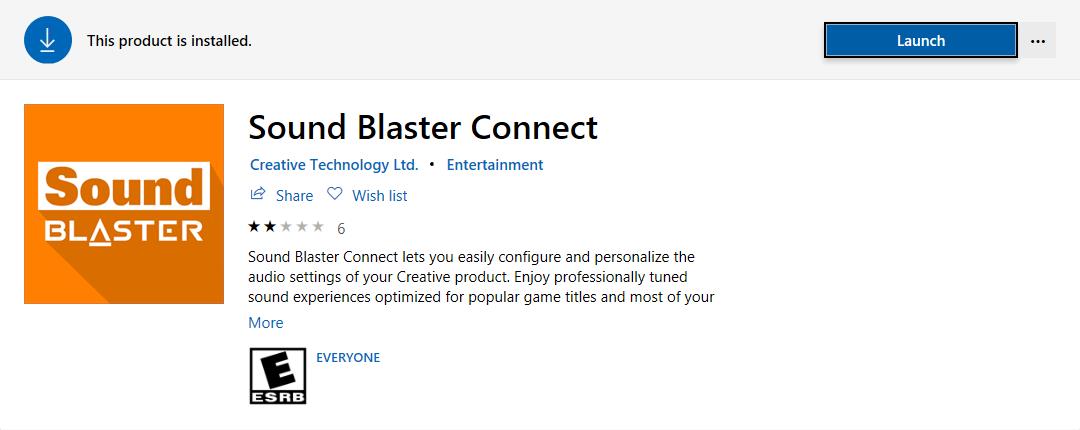
Wie installiere ich die App Sound Blaster Connect unter Windows 10 RS4 oder neuer?(2018/10/1)
A:Im Normalfall wird das System die App automatisch im Hintergrund herunterladen, nachdem der Sound-Treiber von Realtek installiert wurde. Tippen Sie bitte in die Windows-Suche "Sound Blaster Connect” ein, um Zugriff auf die App zu erhalten.
Wenn die App in Ihrem System nicht auftaucht, befolgen Sie bitte die folgenden Schritte, um die App manuell zu installieren.
1. Stellen Sie sicher, dass Ihr Mainboard Creative Sound unterstützt und der Sound-Treiber von Realtek installiert ist.
* Besuchen Sie die Spezifikations-Seite auf www.ASRock.com, um weitere Details zu erfahren.
* Der Sound-Treiber von Realtek kann von der Support-CD installiert oder von der offiziellen Webseite von ASRock heruntergeladen werden.
2. Suchen Sie die Seite (nachfolgender Link) von "Sound Blaster Connect” im Microsoft Store auf und klicken Sie auf "Get”, um den Download zu starten. https://www.microsoft.com/en-sg/store/p/sound-blaster-connect/9n66rljrt8z2
3. Klicken Sie nach der Installation auf "Launch", um die App zu starten.
Bitte beachten Sie die folgende Tabelle, die zeigt welches Modell Creative SoundBlaster Cinema5 unterstützen.
Q (Q&A-142|469):
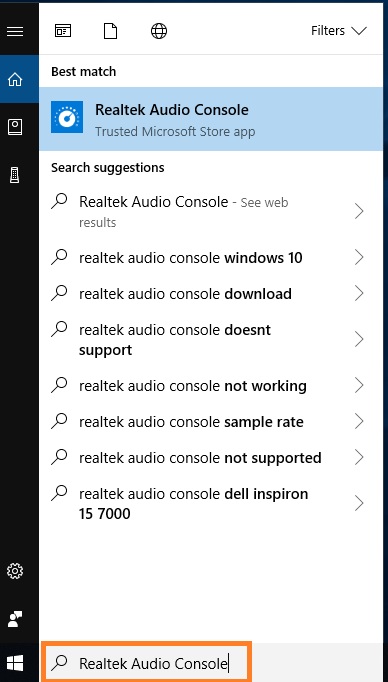
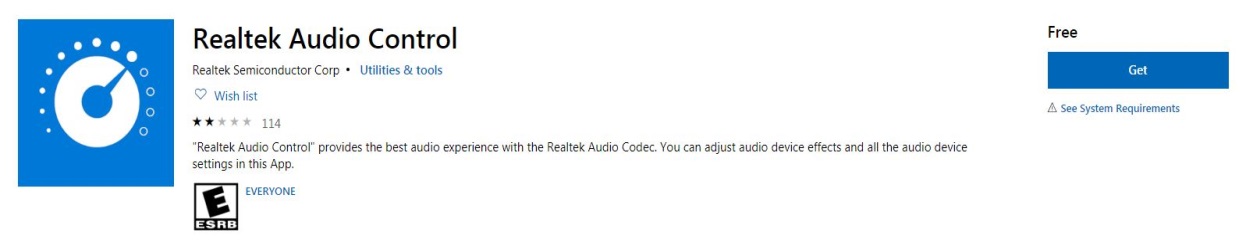
Wie installiere ich die App Realtek Audio Console unter Windows 10 RS4 oder neuer?(2018/10/1)
A:Im Normalfall wird das System die App automatisch im Hintergrund herunterladen, nachdem der Sound-Treiber von Realtek installiert wurde. Tippen Sie bitte in die Windows-Suche "Realtek Audio Console” ein, um Zugriff auf die App zu erhalten.
*Verbinden Sie bitte das Netzwerkkabel, wenn Sie den Sound-Treiber von Realtek installieren.
Wenn die App in Ihrem System nicht auftaucht, befolgen Sie bitte die folgenden Schritte, um die App manuell zu installieren.
1. Gehen Sie in den Gerätemanager, um zu prüfen, ob der Sound-Treiber von Realtek installiert ist.
* Der Sound-Treiber von Realtek kann von der Support-CD installiert oder von der offiziellen Webseite von ASRock heruntergeladen werden: www.ASRock.com.
2. Nutzen Sie den folgenden Link, um Zugriff auf "Realtek Audio Control” im Microsoft Store zu erhalten und klicken Sie auf "Get”, um den Download zu starten. https://www.microsoft.com/store/productId/9P2B8MCSVPLN
3. Klicken Sie nach der Installation auf "Launch”, um die App zu starten.
Q (Q&A-137|457):
Ich möchte das Windows Mixed Reality Headset mit Onboard-HDMI nutzen, was muss ich machen?(2017/12/1)
A:Bitte befolgen Sie die folgenden Schritte:
1. Nutzen Sie die "Microsoft Windows Mixed Reality PC hardware guidelines” um die Hardwareanforderungen abzugleichen. https://support.microsoft.com/en-us/help/4039260/windows-10-mixed-reality-pc-hardware-guidelines
* Windows Mixed Reality benötigt eine integrierte Intel HD Graphics 620 oder eine leistungsstärkere Grafikkarte mit DX12-Fähigkeit.
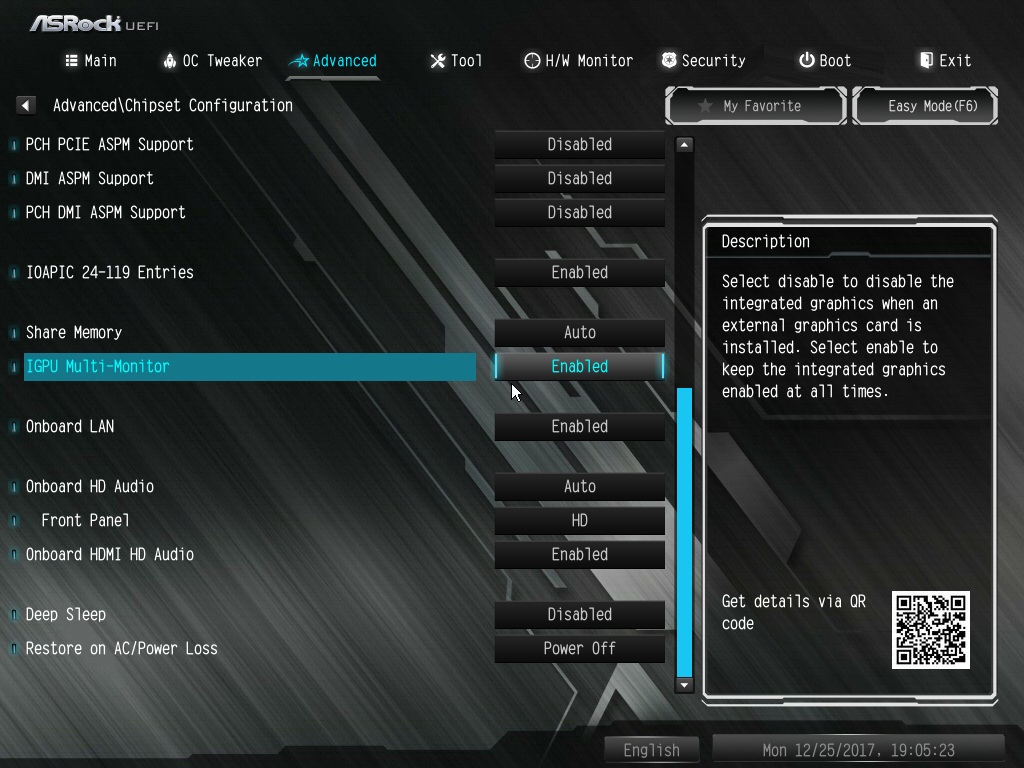
2. Wen eine externe Grafikkarte installiert ist, aktivieren Sie im BIOS bitte die Funktion "IGPU Multi-Monitor”.
BIOS-Pfad: Advanced > Chipset Configuration > IGPU Multi-Monitor
3. Laden Sie die VGA-Treiber mit der Version 15.60.01.4877 von dem Download-Center von Intel herunter und installieren Sie diese.
Download-Link: https://downloadcenter.intel.com/product/128199/Graphics-for-8th-Generation-Intel-Processors
4. Verbinden Sie den USB-3.0-Stecker des "Windows Mixed Reality Headset” mit dem Onboard-USB-3.0-Port.
5. Verbinden Sie den HDMI-Stecker des "Windows Mixed Reality Headset” mit dem-Onboard HDMI-Port.
Das Windows Mixed Reality Headset sollte nun funktionieren.
Q (Q&A-135|455):
Wie spiele ich mit einem Receiver Dolby ATMOS vom Z270 Gaming-ITX/ac ab?(2017/10/1)
A:Beachten Sie bitte die folgenden Voraussetzungen, Konfigurationen und den Setup-Vorgang.
[Voraussetzungen]
OS: Windows 10
Receiver / Decoder: Onkyo TX-NR 747 oder ein anderer Receiver mit Unterstützung für HDCP 2.2
Laufwerk: Pioneer Ultra HD (Blu-ray-Laufwerk)
BD Disk: Most 3D / 4K BD-Disk für Filme
Wiedergabe-Software: Power DVD 14 oder eine neuere Version
[Setup]
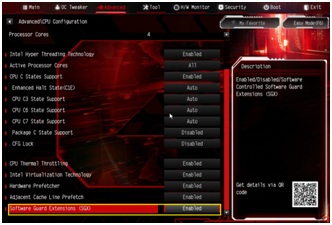
1. Drücken Sie während des Startvorgangs des Systems die Taste "F2", um in das UEFI zu gelangen.
Gehen Sie zu "Advanced” > "CPU Configuration” und aktivieren Sie die Option "Software Guard Extensions".
Drücken Sie die Taste "F10", um zu speichern und das BIOS-Setup zu beenden.
2. Booten Sie das Betriebssystem und installieren Sie alle Mainboard-Treiber.
Installieren Sie die ME-Treiber in Version 11.6.0.1126 (unterstützt Ultra HD Blu-ray). Laden Sie die Treiber über den folgenden Link herunter: http://www.asrock.com/MB/Intel/Fatal1ty%20Z270%20Gaming-ITXac/index.asp#osW1064
3. Gehen Sie in die Systemsteuerung > Hardware und Sound > Sound. Wählen Sie dort "Receiver output”.
Q (Q&A-119|396):
Funktioniert DTS Connect 5.1 Surround unter Windows 10? (2015/8/1)
A:Auf Grund von Begrenzungen in Microsofts Windows-10-Betriebssystem funktioniert DTS Connect 5.1 Surround nicht unter Windows 10.
Wenn Sie DTS Connect 5.1 Surround nutzen möchten, verwenden Sie bitte eine frühere Version, wie zum Beispiel Windows 8.1, Windows 8 oder Windows 7.
Q (Q&A-106|350):
Wenn ich unter Windows 8 (32 Bit /64 Bit) Musik mit dem Media Player abspiele und einen Kopfhörer in den vorderen Audioausgang einstecke, stoppt der Media Player und zeigt eine Fehlermeldung. Was kann ich machen? (2013/9/1)
A:Bitte starten Sie den Media Player nach dem Fehler erneut und starten Sie das Lied neu, um Sound vom vorderen Audioausgang zu erhalten.
Q (Q&A-89|297):
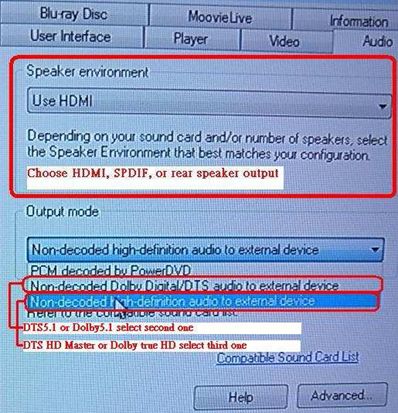
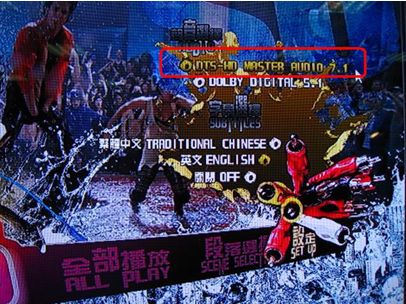
Wie kann ich digitalen Sound (DTS5.1, Dolby5.1, DTS HD Master und Dolby True HD) über HDMI oder SPDIF einrichten?(2011/11/1)
A:Voraussetzungen:
Betriebssystem: Windows7, Vista SP2 oder neuer.
Receiver / Decoder: Onkyo TX-SR608 Verstärker als Beispiel:
Abspiel-Software: Zum Beispiel Power DVD10 v10.0.2025.52 oder eine andere vergleichbare Software.
Setup:
1. Bitte installieren Sie zunächst alle Treiber von der Support/Treiber-CD und überprüfen Sie danach den Device Manager. Dort sollten kein „!" oder "?" für unerkannte oder nicht gestartet Geräte mehr zu finden sein.
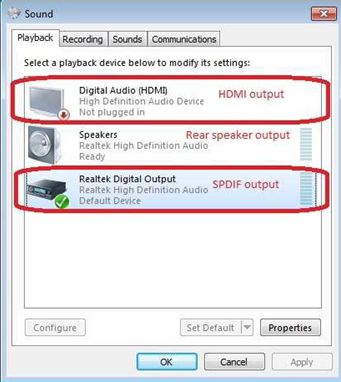
2. Gehen Sie in die Systemsteuerung unter Hardware und Sound > Sound.
Wenn Sie den Ton über HDMI ausgeben wollen, wählen Sie [HDMI Output].
Wenn Sie den Ton über SPDIF ausgeben wollen, wählen Sie [Digital Output].
*Unterschiedliche Mainboard/Chipsätze können hier unterschiedliche Informationen anzeigen. Das obere Bild dient lediglich als Beispiel.
3. Gehen Sie in die Audio Einstellung ihrer Applikation.
Wir zeigen hier abermals PowerDVD 10 als Beispiel. Setzen Sie dort „Speaker environment" und „Output modes" auf die gewünschte Einstellung.
4. Stellen Sie ihren Decoder/Verstärker auf Digital-Sound und die gewünschte Einstellung.
5. Stellen Sie das korrekte Ausgabeformat passend zum Medium ein, welches Sie abspielen wollen.
6. Danach können Sie das Medium abspielen.
Q (Q&A-78|263):
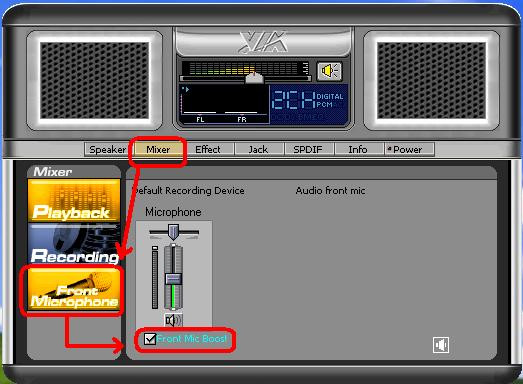
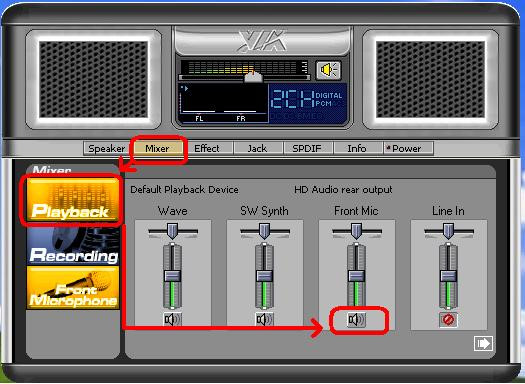
If I use AC'97 front audio panel with VIA® audio codec motherboard, how do I connect AC'97 front panel to HD Audio header on the motherboard?(2010/2/10)
A:If you use AC'97 front audio panel, please install it to the HD audio header as below:
A. Connect Mic_IN (MIC) to MIC2_L.
B. Connect Audio_R (RIN) to OUT2_R and Audio_L (LIN) to OUT2_L.
C. Connect Ground (GND) to Ground (GND).
D. MIC_RET and OUT_RET are for HD audio panel only. You don't need to connect them for AC'97 audio panel.
E. Enter BIOS Setup Utility. Enter Advanced Settings, and then select
Chipset Configuration. Set the Front Panel Control option from [Auto] to [Enabled]. For Windows® XP
F. Enter Windows® system. Click the icon on the lower right hand taskbar to enter VIA® ADeck. Click "Mixer", select "Front Microphones", choose "Front Mic Boost", and leave.
Like below picture:
H. If you want to hear your voice through Front Mic, Please click "Mixer", select "Play Back", choose "Front Mic", and leave.
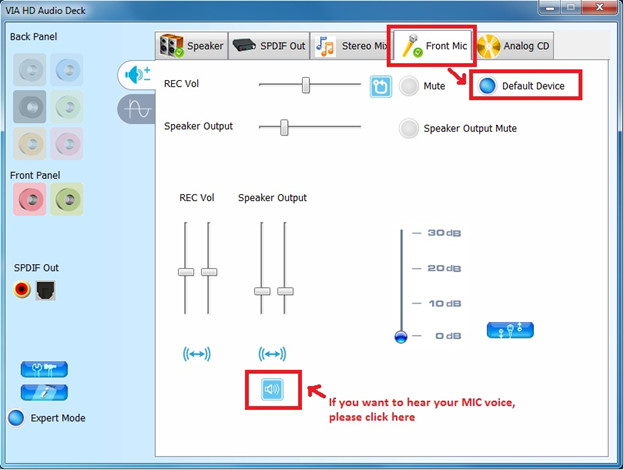
Like below picture: For Windows® Vista™ / Windows® 7
F. Enter BIOS "Chipset Settings" page, manual [Front Panel] to [Enable].
G. Enter Windows® system. Click the icon on the lower right hand taskbar to enter VIA® VDeck. Click "Front Mic", select "Default Device"
H. If you want to hear your voice through Front Mic, Please click "Speaker Output" icon.
Like below picture:
Q (Q&A-70|245):
I install ATI 2xxx, 3xxx, 4xxx series PCIE VGA card on the motherboard. After installing all Windows® XP drivers from the motherboard, it still shows an unknown "audio device on the high definition audio bus." message under device manager. What could I try?(2009/1/12)
A:There is an integrated audio chip in the ATI 2xxx, 3xxx, 4xxxx series graphics cards.
Please install ATI HDMI audio driver.
http://ati.amd.com/support/drivers/xp/hdmiaudio-xp.html
Q (Q&A-69|241):
I have a motherboard with Realtek HD Audio Codec. When I use Windows® XP SP3 or upgrade to Windows® XP SP3, the onboard audio doesn't work. What could I try?(2008/11/27)
A:Please try the Realtek latest audio driver.
The driver is available from this link: http://www.realtek.com.tw/downloads/downloadsView.aspx?Langid=1&PNid=14&PFid=24&Level=4&Conn=3&DownTypeID=3&GetDown=false
Q (Q&A-66|232):
I install more than 2GB system memory on my system. When I run the "Sound Recorder" under Windows® XP, it always shows the following error message. What's wrong? (2008/7/31)
A:This is the limitation of Windows® XP. Please refer to the Microsoft® Knowledge Base for details: http://support.microsoft.com/kb/284893
Q (Q&A-65|230):
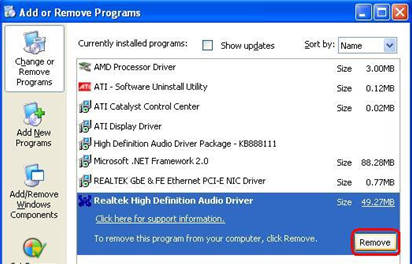
When I install Realtek HD Audio driver, I found the system shows below error message. What can I do? (2008/6/26)
A:Please refer to below steps to reinstall Realtek HD Audio driver:
1.Enter into "Add or Remove Programs" and remove "Realtek High Definition Audio Driver"
2.Disable all "Microsoft® UAA Bus Driver for High Definition Audio" in Device Manager first
3.Then uninstall all "Microsoft® UAA Bus Driver for High Definition Audio" from the system.
4.Reboot system
5.Reinstall "Realtek HD Audio driver" from Motherboard Support CD.
If you still meet this problem, please reinstall fresh Windows® system.
Q (Q&A-63|226):
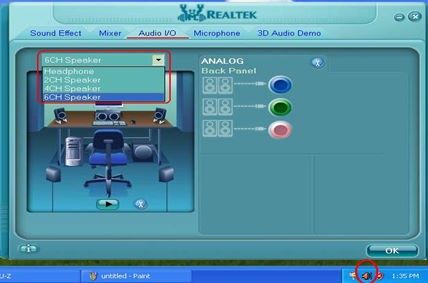
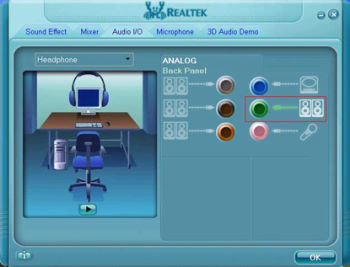
My motherboard with Realtek ALC662 audio codec supports 5.1 channel HD Audio. But it has 3 audio connectors (Light blue, Lime and Pink) on the rear audio panel. How do I connect my 5.1 channel speakers to the rear audio panel?(2008/3/24)
A:Please refer to following steps to connect your 5.1 channel speakers:
1. Connect the "Rear Speaker" to Line In (Light blue) port
2. Connect the "Front Speaker" to Line Out (Lime) port
3. Connect the "Central / Subwoofer" to Microphone (Pink) port
4. Adjust the "Audio I/O" setting to "6CH Speaker" in REALTEK Audio Management. Please refer to the following picture:
Q (Q&A-57|207):
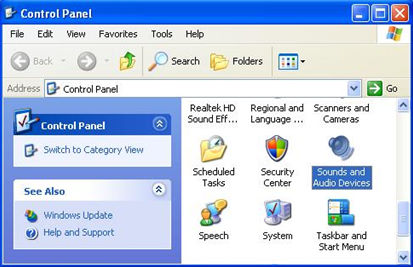
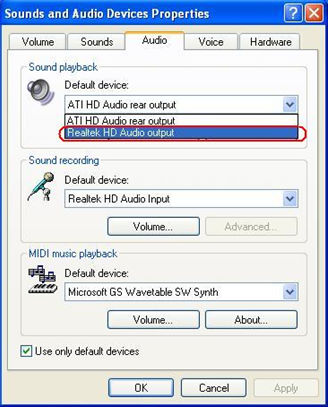
After installing ATI HDMI audio driver for my ATI HD 2xxx series PCIE card, I found the onboard sound will not work. How do I fix the problem?(2007/9/10)
A:Please kindly refer to below steps to check your system setting.
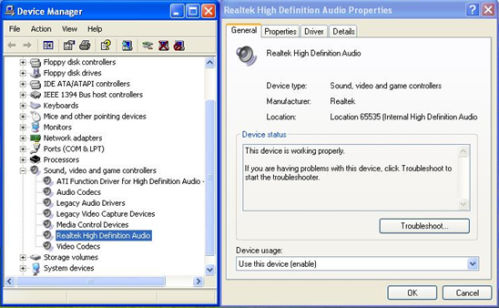
1.Please double check the onboard sound is working properly in Device Manager.
(If not, please reinstall Realtek HD Audio driver from Support CD.)
2.Enter the Sound setting in the Control Panel.
3.If the Default device of the Sound playback is "ATI HD Audio rear output", please change it to "Realtek HD Audio output".
4.Press "OK" to save setting.
Q (Q&A-54|200):
I have a motherboard with Realtek HD audio codec. After resume Windows® Vista™ from sleep or from hibernation, the high definition audio device may no longer work. How do I solve this?(2007/4/25)
A:This is caused by Microsoft. It can be solved by installing the Microsoft® Hot fix. Please refer to the Microsoft® Knowledge Base: http://support.microsoft.com/kb/929685/en-us
Q (Q&A-53|198):
I have a motherboard with Realtek HD audio codec. After installing the Microsoft® Security Update 925902 and 928843, my system shows the following error message. How do I fix this? (2007/4/20)
A:This is caused by Microsoft. It can be solved by installing the Microsoft® Hot fix. Please refer to the Microsoft® Knowledge Base: http://support.microsoft.com/kb/935448/
Q (Q&A-52|196):
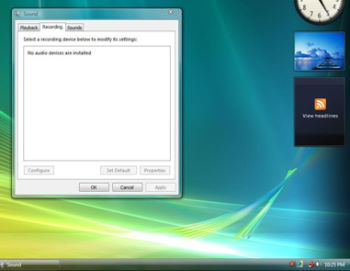
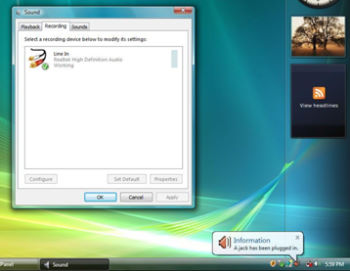
My onboard audio is Realtek HD audio. In the Windows® Vista™, I can't use Sound Recorder to record the audio. What should I do?(2007/3/19)
A:Please refer to below steps to set the audio device.
1.Install Realtek HD Audio driver from motherboard Support CD. Or download the Realtek HD audio driver from ASRock website.
https://www.asrock.com/support/Download.asp
2.Plug in your recording devices (Microphone or other devices) to the Line-in port (or Microphone port), and then the recording device will show up "Line In" (or "Microphone") icon. Please kindly refer to below image. (Control Panel > Sound > Recording)
*Before plug in the recording devices:
*After plug in the recording devices:
3.Reopen the Sound Recorder to record the audio.
Q (Q&A-50|193):
I plugged a headphone in my ASRock motherboard with Realtek HD Audio, and set the "Audio I/O" from "2CH" to "Headphone" in Realtek Audio Manager (picture1).
But the Realtek Audio Manager always recognized my headphone as 2CH speaker after I restarted the operating system (picture2).
What should I do?(2007/1/16)
A:Please refer to the following steps to set up the Realtek Audio Manager correctly.
1.Please remove all audio I/O (Headphones, Speakers, Microphone...) from the motherboard.
2.Please go to Realtek Audio Manager and set the "Audio I/O" you want.
3.Click ok.
4.Please plug your audio I/O back.
5.Restart your system.
Q (Q&A-50|192):
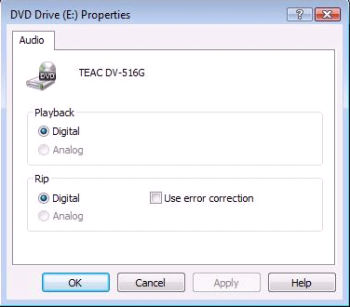
I would like to use the analog CD-in function in Windows® Vista™. But the "Analog" item of Playback and Rip can not be selected in Windows® Vista™. It was gray. Why? (Here is the screenshot.) (2007/1/16)
A:Windows® Vista™ operating system does not support the analog CD-in. The output of CD/DVD-ROM playback will be digital only.
Q (Q&A-42|172):
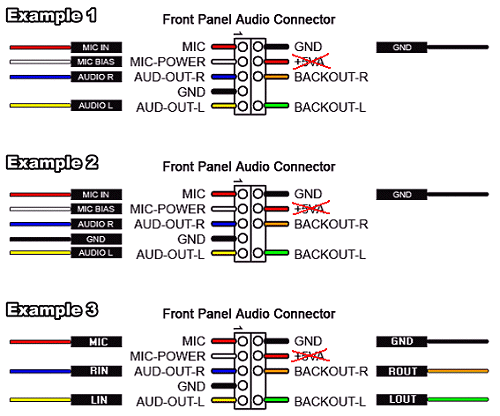
My onboard audio is AC'97 audio. The front panel audio connector cables of my case are different from the description of manual. How should I connect them? Please advice.(2006/4/21)
A:The wording on the front panel connector cables may be different by each chassis manufacturer. Please check the function of each cable. Otherwise it may damage the board if cables are connected to the wrong connectors. We found that if you connect the "GND" (Ground) or "USB VCC" (USB Power) connector pins to the "+5V" pin, it will damage the motherboard after booting up the system. So we recommend you must not install any connector on the +5V pin of the Front Panel Audio header. It will not affect the Audio function if you remove the connector from the +5V pin.
For this reason, we will remove the +5V pin from the Front Panel Audio header of our products in the future.
There are three examples for your reference, please refer to the following pictures.
Q (Q&A-40|164):
If I use AC'97 front audio panel with, how do I connect to the High Definition Audio header on the motherboard and get front audio work?(2006/2/17)
A:If you use AC'97 audio panel, please install it to the front panel audio header as below:
A. Connect Mic_IN (MIC) to MIC2_L.
B. Connect Audio_R (RIN) to OUT2_R and Audio_L (LIN) to OUT2_L.
C. Connect Ground (GND) to Ground (GND).
D. MIC_RET and OUT_RET are for HD audio panel only. You don't need to connect them for AC'97 audio panel.
E. Enter BIOS Setup Utility. Enter Advanced Settings, and then select Chipset Configuration. Set the Front Panel Control option from [Auto] to [Enabled]. For Windows® XP
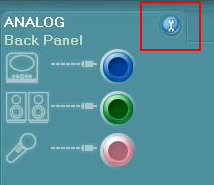
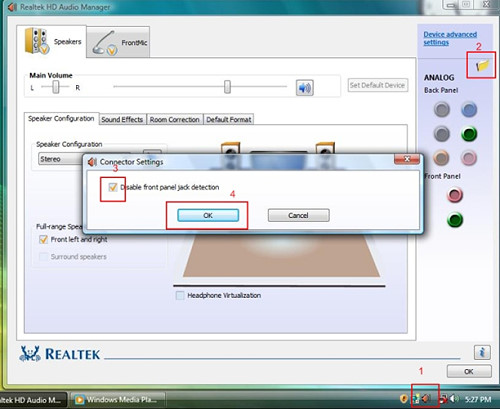
F. Enter Windows® system. Click the icon on the lower right hand taskbar to enter Realtek HD Audio Manager. Click "Audio I/O", select "Connector Settings", choose "Disable front panel jack detection", and save the change by clicking "OK". For Windows® Vista™
F. Enter Windows® system, 1: Double click the icon on the lower right hand taskbar to enter Realtek HD Audio Manager. 2: Click the "Folder" icon at the top-right corner. 3. Check "Disable front panel jack detection". 4. Click "OK".
(Please refer to the following picture)
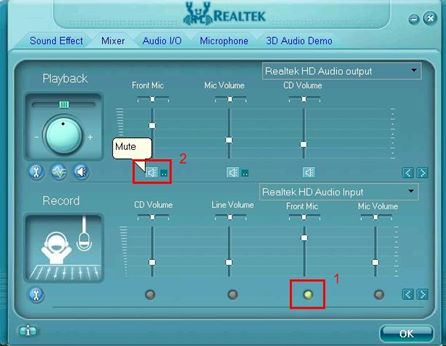
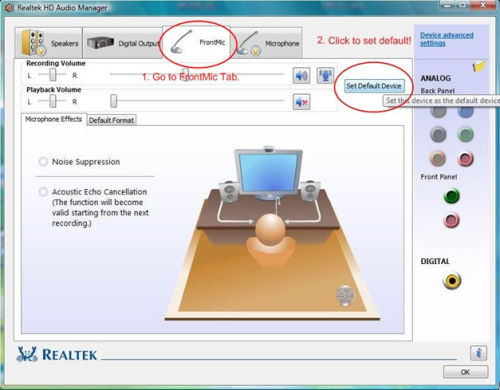
G. To activate the front mic: For Windows® XP:
Please select the Front Mic as default record device in No. 1.
If you want to hear your voice through Front Mic, please deselect "Mute" in No. 2 For Windows® Vista™:
1.Go to the "FrontMic" Tab in the Realtek Control panel.
Click "Set Default Device" to make the Front Mic as the default record device.
Q (Q&A-40|166):
What's the requirement for High Definition Audio to work under Windows® XP 64bit?(2006/2/17)
A:For normal working of High Definition Audio under Windows® XP 64bit, there is a hotfix file provided by Microsoft. Please install the hotfix before installing the audio driver. Otherwise, the audio driver may not be installed successfully.
Please click the link to download the hotfix file:
http://support.microsoft.com/?kbid=901105
Q (Q&A-7|34):
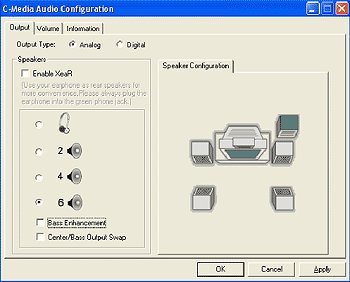
Can I use the microphone if I select 6 speakers in C-Media Audio Configuration?(2003/5/9)
A:If you select 6 speakers in C-Media Audio Configuration for 5.1 CH output, all three audio connectors (Line in, Line out and MIC) are defined as output connectors.
Microphone is an input device. So you are not able to use the microphone at this moment.
Q (Q&A-7|33):
How do I select "Output Type" in C-Media 3D Audio Configuration?(2003/5/9)
A:Please select "Analog" for "Output Device" in C-Media 3D Audio Configuration.
Q (Q&A-2|10):
If I want to use 4/6 speakers, how do I setup 4/6-Channel audio ?(2002/11/26)
A:STEP 1: 4 CH: Connect the front L/R channel to "Line Out", the rear L/R channel to "Line In".
6 CH: Connect the front L/R channel to "Line Out", the rear L/R channel to "Line In", and the Center/Subwoofer channel to "Mic In".
STEP 2:
After installation of C-Media Audio driver, you will find an icon "C-Media Audio configuration" on the taskbar.
STEP 3:
Click the icon, and the screen will show the current audio configuration.
Select "Output" to change your audio configuration. Select "Analog" for Output Type and choose "4 channels" / "6 channels" for your speaker configuration.
 Menü
Menü
 (2008/7/31)
 (2008/6/26)
 (2007/4/20)
 (2007/1/16)