Ние използваме бисквитки, за да ви предложим по-персонализирано и по-гладко изживяване. Посещавайки този уебсайт, вие се съгласявате с използването на бисквитки. Ако предпочитате да не приемате бисквитки или изисквате повече информация, моля, посетете нашата Политика за поверителност.
Ако сте напълно сигурни за категорията на вашия въпрос, може да изберете една от категориите по-долу за често задавани въпроси. Каталог:
Резултати:
Q (Q&A-152|488):
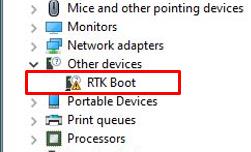
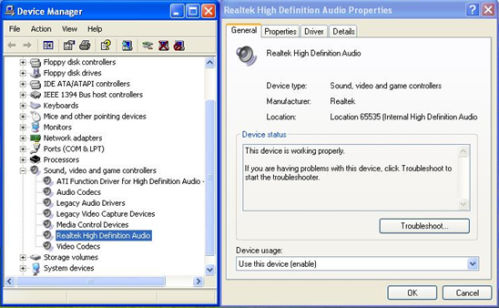
Имам дънна платка TRX40. Под диспечера на устройствата има устройство за стартиране на RTK, което се показва с удивителен знак и няма звук, извеждан от аудио порта. Какво мога да направя, за да го поправя? (2020/4/1)
A:Ако под диспечера на устройствата се показва RTK устройство и аудио портът не може да се използва, моля, следвайте стъпките по-долу, за да премахнете RTK устройството и да позволите на звука да работи правилно.
Стъпка 3. Щракнете с десния бутон върху иконата за старт на работния плот и изберете диспечера на устройствата, за да видите дали в системата ви се показва RTK Boot.
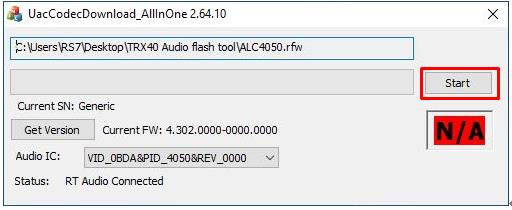
Стъпка 5. Щракнете двукратно върху UacCodecDownload_AllInOne_RsProxy_2.64.10
Стъпка 6. Натиснете бутона Старт, за да започнете флаша на аудио фърмуера.
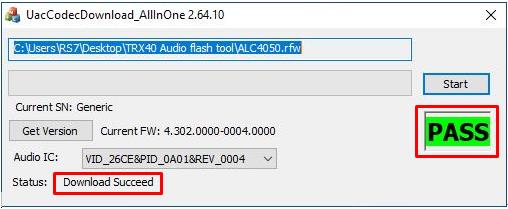
Стъпка 7. След като процесът приключи, инструментът ще покаже Pass, което означава, че флаша на аудио фърмуерът е успешен и не трябва да се показва RTK устройство за вход под диспечера на устройствата.
Q (Q&A-151|487):
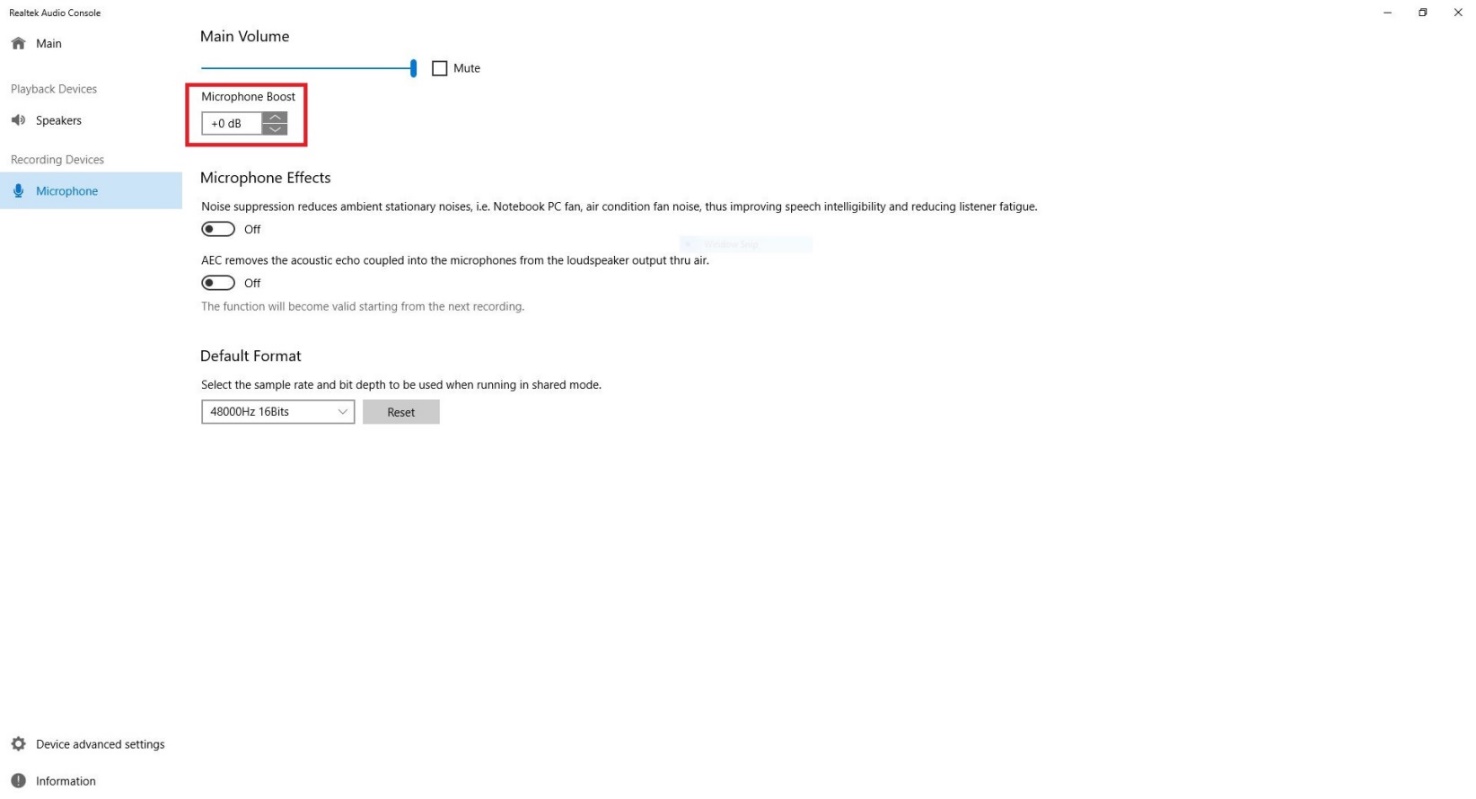
Когато записвам през микрофона в Windows 10 1909, от записите се чуват съскащи звуци. (2020/1/1)
A:Ако от записите се чува съскане, моля, изберете един от методите по-долу, за да избегнете съскане.
Метод 1:
Стъпка 1.
Изтеглете Realtek аудио драйвер с висока разделителна способност от уебсайта на ASRock.
* Моля, уверете се, че вашият LAN кабел е свързан, когато инсталирате звуковия драйвер на Realtek.
Стъпка 2:
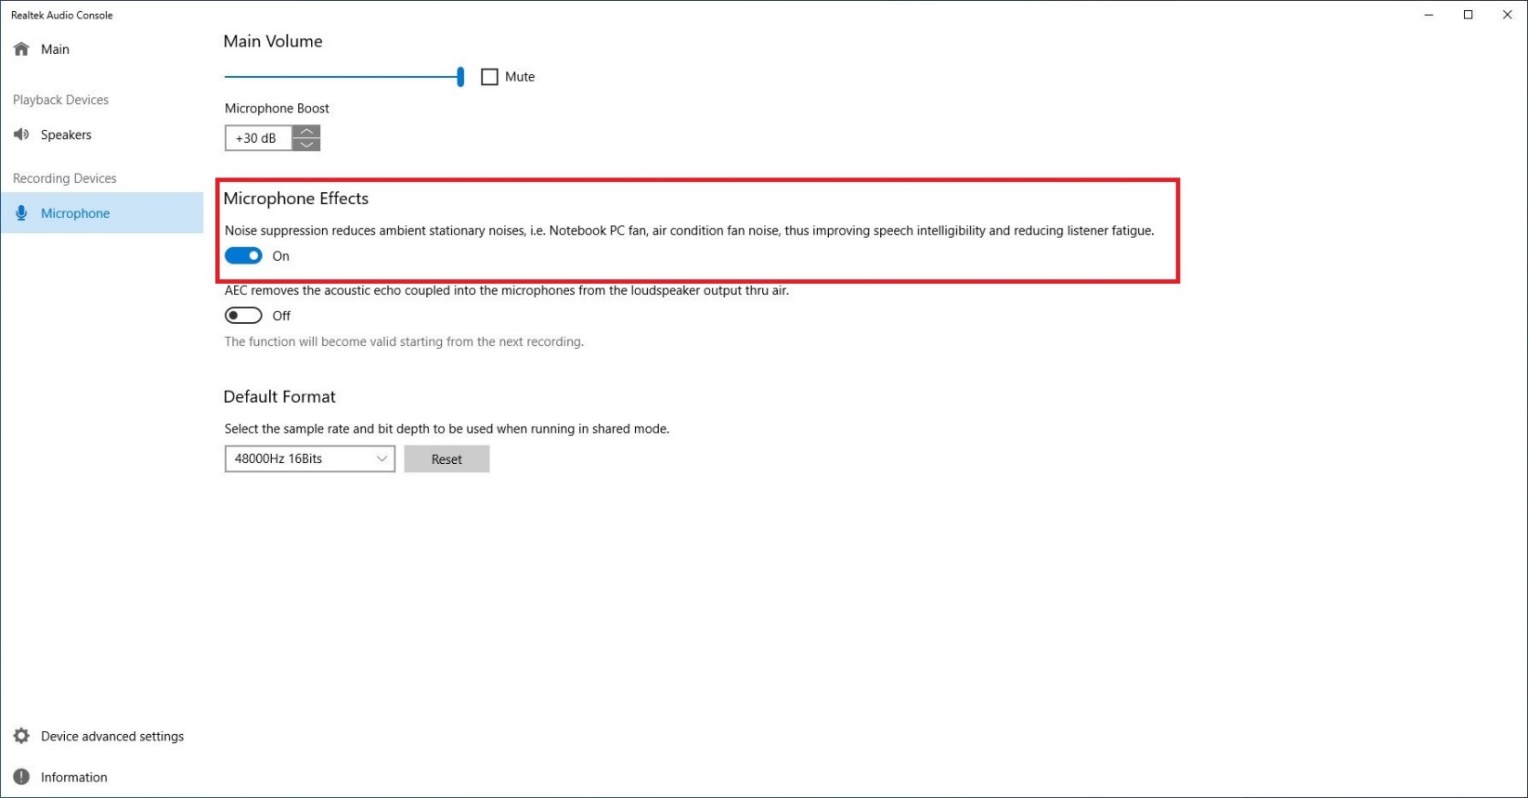
Отворете "Realtek audio console”.
Стъпка 3.
Включете опцията "Noise suppression reduces ambient stationary noises” в приложението Realtek за аудио конзола.
Стъпка 4.
След като настройката по-горе е активирана, качеството на записа ще бъде подобрено.
Метод 2:
Стъпка 1.
Вижте стъпка 1 и стъпка 2 от метод 1, за да отворите "Realtek audio console”.
Стъпка 2.
Променете Microphone Boost на +0db.
Стъпка 3.
След като стойността на усилването бъде коригирана на + 0db, качеството на записа ще бъде подобрено.
Q (Q&A-142|468):
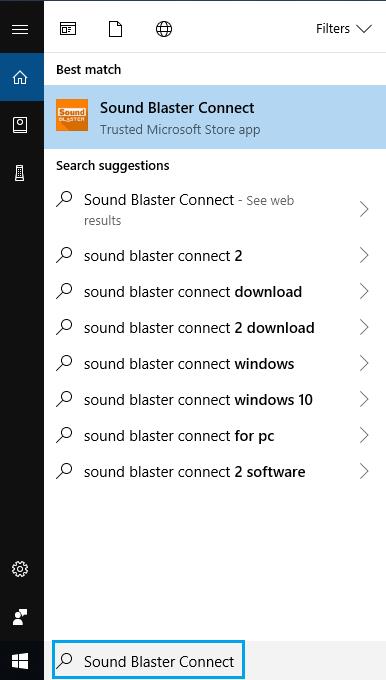
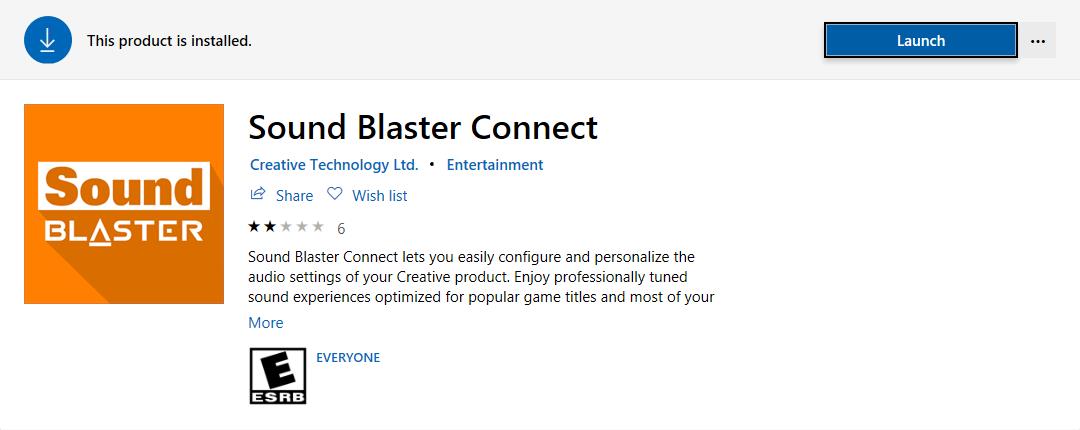
Как да инсталирам Sound Blaster Connect APP под Windows 10 RS4 или по-нова версия?(2018/10/1)
A:.По принцип системата ще изтегли автоматично APP на заден план след инсталирането на Realtek Audio драйвер. Моля, въведете "Sound Blaster Connect" в лентата за търсене на Win10, за да получите достъп до APP.
Ако APP не се показва на вашата система, моля следвайте стъпките по-долу, за да я инсталирате ръчно.
1. Уверете се, че дънната ви платка поддържа Creative Sound и е инсталиран драйвер Realtek Audio.
* Моля, посетете страницата със спецификациите на дънната платка на www.ASRock.com за подробности.
* Realtek Audio драйверът може да бъде инсталиран / изтеглен от поддържащия CD и официалния уеб сайт на ASRock..
2. Влезте в "Sound Blaster Connect" в Microsoft Store и кликнете върху "Get", за да започнете да изтегляте. https://www.microsoft.com/en-sg/store/p/sound-blaster-connect/9n66rljrt8z2
3. След инсталирането, щракнете върху Стартиране, за да стартирате APP.
Моля, направете справка със следната таблица, която поддържа Creative SoundBlaster Cinema5.
Q (Q&A-142|469):
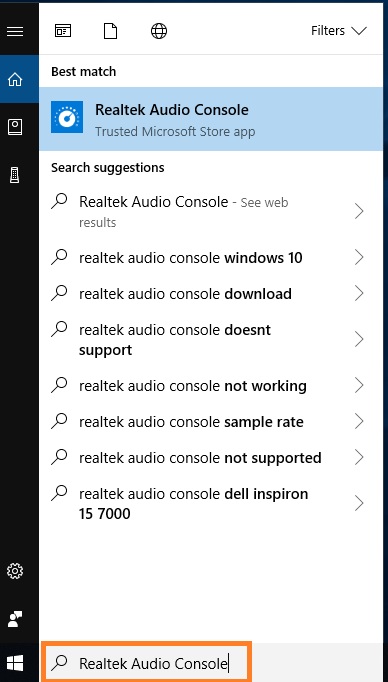
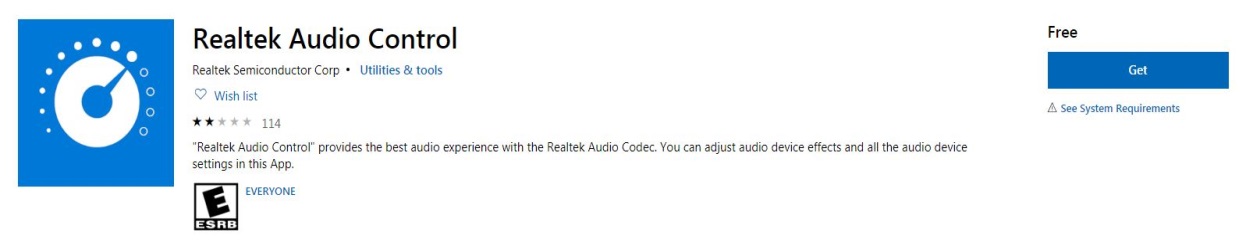
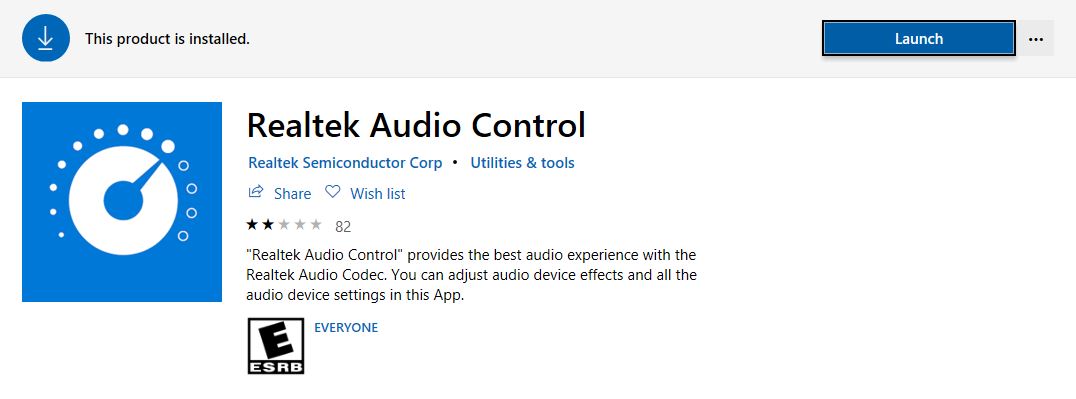
Как да инсталирам APP Realtek Audio Console под Windows 10 RS4 или по-нова версия?(2018/10/1)
A:По принцип системата ще изтегли автоматично APP на заден план след инсталирането на Realtek Audio драйвер.
Моля, въведете "Realtek Audio Console" в лентата за търсене на Win10 за достъп до APP.
* Моля, свържете LAN кабела, когато инсталирате Realtek Audio драйвера.
Ако APP не се показва на вашата система, моля следвайте стъпките по-долу, за да я инсталирате ръчно.
1. Отидете в мениджъра на устройства, за да проверите дали е инсталиран драйверът Realtek Audio.
* Realtek аудио драйверът може да бъде инсталиран / изтеглен от CD и ASRock официален уеб сайт: www.ASRock.com.
2. Моля, обърнете се към следната връзка, за да получите достъп до "Realtek Audio Control" в
Microsoft Store и кликнете върху "Get", за да започнете да изтегляте. https://www.microsoft.com/store/productId/9P2B8MCSVPLN
3. След инсталирането, щракнете върху Стартиране, за да стартирате APP.
Q (Q&A-137|457):
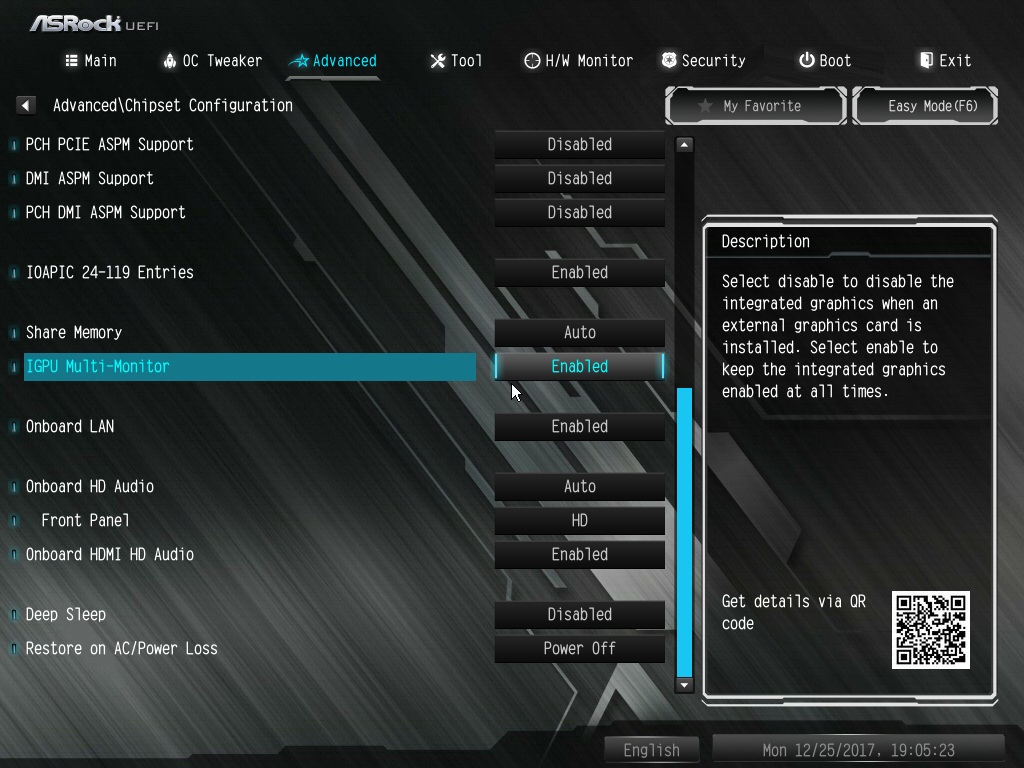
Бих искал да използвам Mixed Reality Headset на Windows на вградения HDMI, какво трябва да направя?(2017/12/1)
A:Моля, следвайте стъпките по-долу
1. Обърнете се към указанията за хардуера на "Microsoft Windows Mixed Reality PC hardware guidelines”, за да проверите изискванията за хардуера на системата. https://support.microsoft.com/en-us/help/4039260/windows-10-mixed-reality-pc-hardware-guidelines
* Windows Mixed Reality изисква интегрирана Intel HD Graphics 620 или по-добра DX12-съвместима графичена карта.
2. Ако е инсталирана външна графична карта, активирайте "IGPU Multi-Monitor" под BIOS.
BIOS Path: Advanced > Chipset Configuration > IGPU Multi-Monitor
3. Изтеглете VGA драйвера версия 15.60.01.4877 от центъра за изтегляне на Intel и го инсталирайте на вашата система.
Линк за изтегляне: https://downloadcenter.intel.com/product/128199/Graphics-for-8th-Generation-Intel-Processors
4. Инсталирайте USB 3.0 съединителя "Windows Mixed Reality Reality Headset" на вградения USB 3.0 порт.
5. Инсталирайте HDMI конектора за"Windows Mixed Reality Headset” на HDMI порта
"Windows Mixed Reality Headset” трябва да работи сега.
Q (Q&A-135|455):
Как да възпроизвеждам Dolby ATMOS през приемник на Z270 Gaming-ITX / ac?(2017/10/1)
A:Моля, направете справка със следните изисквания, конфигурации и процедури за настройка.
[Изисквания]
OС: Windows 10
Приемник / декодер: Onkyo TX-NR 747 или друг приемник, който поддържа HDCP 2.2
плейър Pioneer Ultra HD Blu-ray drive
BD Диск: Most 3D / 4K BD disk movie
Софтуер за възпроизвеждане: Power DVD 14 or later version
[Настройка]
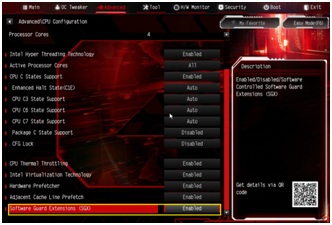
1. Когато системата стартира, натиснете "F2", за да влезете в екрана за настройка на UEFI.
Отидете на Advanced > CPU Configuration и активирайте "Software Guard Extensions" в настройките на BIOS.
Натиснете "F10", за да запазите и излезете от екрана за настройка на BIOS.
Стартирайте в O.С. Инсталирайте всички драйвери за M / B.
Инсталирайте ME драйвера версия: 11.6.0.1126 (поддържа Ultra HD Blu-ray). Изтеглете драйвера от следната връзка: http://www.asrock.com/MB/Intel/Fatal1ty%20Z270%20Gaming-ITXac/index.asp#osW1064
3. Отворете Control Panel > Hardware and sound > Sound и изберете "Receiver output”.
Q (Q&A-119|396):
Работи ли DTS Connect 5.1 Surround под Windows 10? (2015/8/1)
A:Поради ограниченията в Microsoft Windows 10 ОС, DTS Connect 5.1 Surround не работи под Windows 10.
АКо желаете да използвате DTS connect 5.1 Surround, моля, изберете по-ранни версии, т.е. Windows 8.1/ Windows 8/ Windows 7.
Q (Q&A-106|350):
Когато пускам музика или филми с Media Player под 32/64-битова ОС Windows 8, Media Player неочаквано спира и извежда съобщение за грешка всеки път, когато свързвам слушалки в предния аудио панел. Какво да направя?(2013/9/1)
A:Моля отворете отново Media Player и пъснете пак файла, за да имате звук от предния аудио панел.
Q (Q&A-89|297):
Как да настроя цифровият звуков изход (DTS5.1, Dolby5.1, DTS HD Master и Dolby True HD) чрез HDMI или SPDIF?(2011/11/1)
A:Изисквания:
Операционна Система: Windows7, Vista SP2 или по-нова.
Рисийвър / декодер: например усилвател Onkyo TX-SR608:
Софтуер за възпроизвеждане: например Power DVD10 v10.0.2025.52 или друг софтуер за възпроизвеждане.
Настройка:
1. Моля, инсталирайте всички драйвери от диска за поддръжка, като след това проверете мениджъра на устройства – не трябва да има в неговия списък никакви "!" или"?" символи.
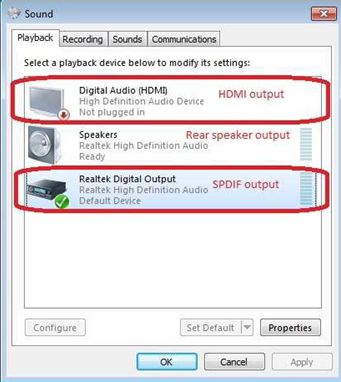
2. Моля влезте в Контролен Панел > Хардуер и звук > Звук,
Ако искате изход чрез HDMI, моля изберете [HDMI изход]
Ако искате изход чрез SPDI, моля изберете [Цифров изход]
*Различните дънни платки/чипсети може да покажат различна информация, затова тези снимки са само за референция.
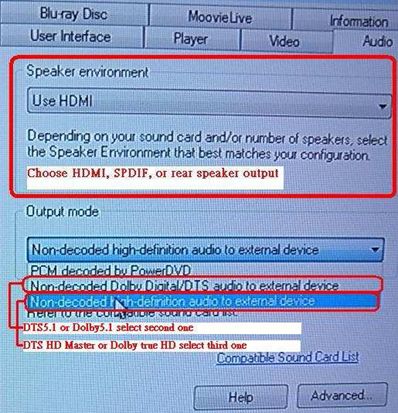
3. Влезте в настройките за звук на вашето приложение.
Ние ще вземем Power DVD 10 за пример: Изберете Speaker environment и Output modes както ги желаете.
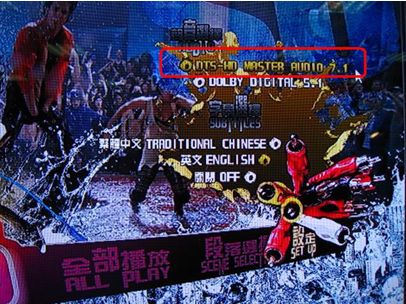
4. Настройте своя decoder/amplifier за цифров звуков изход, който искате.
6. Сега вече може да възпроизвеждате съдържанието/източника.
Q (Q&A-78|263):
Ако ползвам предния аудио панел за AC'97 с кодека за дънната платка на VIA, как да свържа предния AC'97 панел към HD Audio входа на дънната платка?(2010/2/10)
A:Ако ползвате преден аудио панел AC'97, моля инсталирайте HD Audio по следния начин:
A. Свържете Mic_IN (MIC) към MIC2_L.
B. Свържете Audio_R (RIN) към OUT2_R и Audio_L (LIN) към OUT2_L. C. Свържене Ground (GND) към Ground (GND).
D. MIC_RET и OUT_RET са само за HD аудио панела. Няма нужда да ги свързвате към AC'97 аудио панела.
E. Влезте в настройките на BIOS. Отидете в Advanced Settings и след това изберете
Chipset Configuration. Установете опцията Front Panel Control от [Автоматично] на [Разрешено]. За Windows® XP
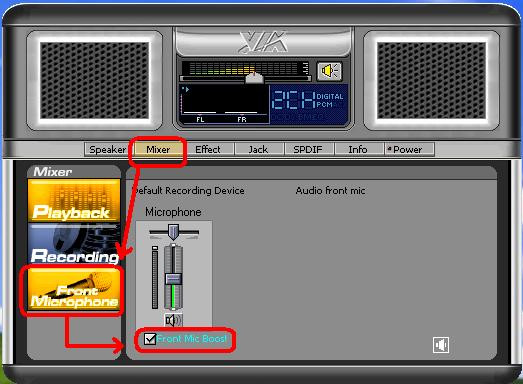
F. Влезте в Windows. Щракнете иконата в долния десен ъгъл за да влезете във VIA® ADeck.
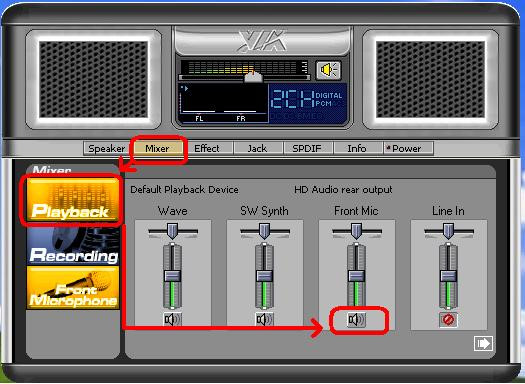
Щракнете "Mixer", изберете "Front Microphones", изберете "Front Mic Boost", и затворете. Подобно на снимката долу:
H. Ако искате да чуете своя глас чрез Предният микрофон, моля щракнете "Mixer", изберете"Play
Back", изберете "Front Mic" и затворете. Подобно на снимката долу: За Windows® Vista™ / Windows® 7
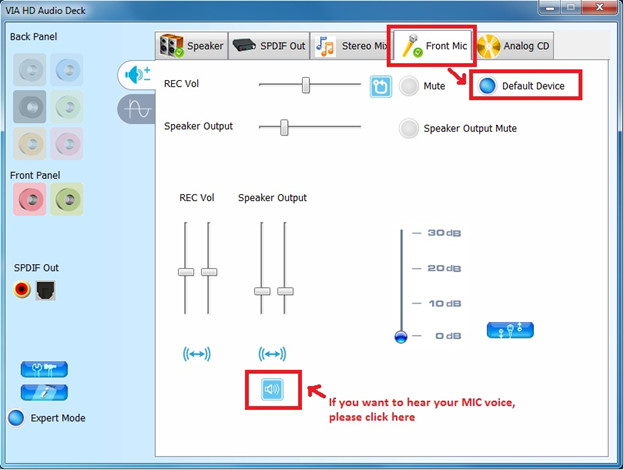
F. Влезте в страницата на BIOS "Chipset Settings" и промене [Преден панел] на [Разрешен].
G. Влезте в Windows. Щракнете иконата в долния десен ъгъл за да влезете във VIA® VDeck. Щракнете "Front Mic" и изберете "Default Device"
H. Ако искате да чувате своя глас от предният микрофон, моля щракнете иконата "Speaker Output". Подобно на следващата снимка:
Q (Q&A-70|245):
I install ATI 2xxx, 3xxx, 4xxx series PCIE VGA card on the motherboard. After installing all Windows® XP drivers from the motherboard, it still shows an unknown "audio device on the high definition audio bus." message under device manager. What could I try?(2009/1/12)
A:There is an integrated audio chip in the ATI 2xxx, 3xxx, 4xxxx series graphics cards.
Please install ATI HDMI audio driver.
http://ati.amd.com/support/drivers/xp/hdmiaudio-xp.html
Q (Q&A-69|241):
I have a motherboard with Realtek HD Audio Codec. When I use Windows® XP SP3 or upgrade to Windows® XP SP3, the onboard audio doesn't work. What could I try?(2008/11/27)
A:Please try the Realtek latest audio driver.
The driver is available from this link: http://www.realtek.com.tw/downloads/downloadsView.aspx?Langid=1&PNid=14&PFid=24&Level=4&Conn=3&DownTypeID=3&GetDown=false
Q (Q&A-66|232):
I install more than 2GB system memory on my system. When I run the "Sound Recorder" under Windows® XP, it always shows the following error message. What's wrong? (2008/7/31)
A:This is the limitation of Windows® XP. Please refer to the Microsoft® Knowledge Base for details: http://support.microsoft.com/kb/284893
Q (Q&A-65|230):
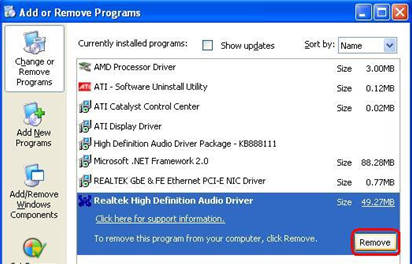
When I install Realtek HD Audio driver, I found the system shows below error message. What can I do? (2008/6/26)
A:Please refer to below steps to reinstall Realtek HD Audio driver:
1.Enter into "Add or Remove Programs" and remove "Realtek High Definition Audio Driver"
2.Disable all "Microsoft® UAA Bus Driver for High Definition Audio" in Device Manager first
3.Then uninstall all "Microsoft® UAA Bus Driver for High Definition Audio" from the system.
4.Reboot system
5.Reinstall "Realtek HD Audio driver" from Motherboard Support CD.
If you still meet this problem, please reinstall fresh Windows® system.
Q (Q&A-63|226):
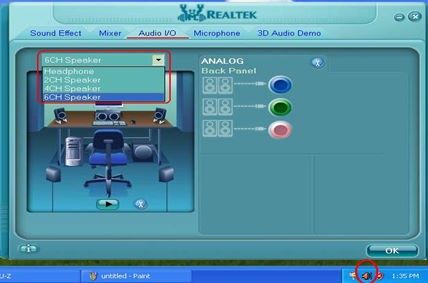
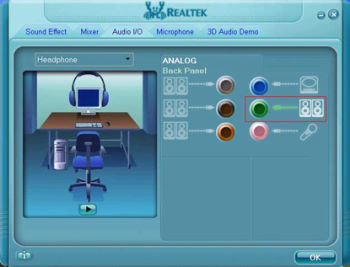
My motherboard with Realtek ALC662 audio codec supports 5.1 channel HD Audio. But it has 3 audio connectors (Light blue, Lime and Pink) on the rear audio panel. How do I connect my 5.1 channel speakers to the rear audio panel?(2008/3/24)
A:Please refer to following steps to connect your 5.1 channel speakers:
1. Connect the "Rear Speaker" to Line In (Light blue) port
2. Connect the "Front Speaker" to Line Out (Lime) port
3. Connect the "Central / Subwoofer" to Microphone (Pink) port
4. Adjust the "Audio I/O" setting to "6CH Speaker" in REALTEK Audio Management. Please refer to the following picture:
Q (Q&A-57|207):
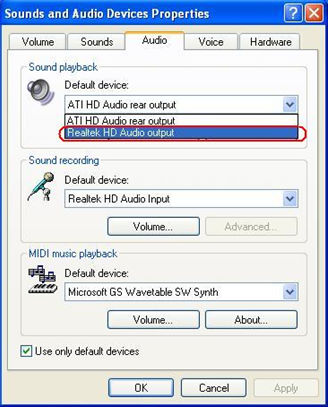
After installing ATI HDMI audio driver for my ATI HD 2xxx series PCIE card, I found the onboard sound will not work. How do I fix the problem?(2007/9/10)
A:Please kindly refer to below steps to check your system setting.
1.Please double check the onboard sound is working properly in Device Manager.
(If not, please reinstall Realtek HD Audio driver from Support CD.)
2.Enter the Sound setting in the Control Panel.
3.If the Default device of the Sound playback is "ATI HD Audio rear output", please change it to "Realtek HD Audio output".
4.Press "OK" to save setting.
Q (Q&A-54|200):
I have a motherboard with Realtek HD audio codec. After resume Windows® Vista™ from sleep or from hibernation, the high definition audio device may no longer work. How do I solve this?(2007/4/25)
A:This is caused by Microsoft. It can be solved by installing the Microsoft® Hot fix. Please refer to the Microsoft® Knowledge Base: http://support.microsoft.com/kb/929685/en-us
Q (Q&A-53|198):
I have a motherboard with Realtek HD audio codec. After installing the Microsoft® Security Update 925902 and 928843, my system shows the following error message. How do I fix this? (2007/4/20)
A:This is caused by Microsoft. It can be solved by installing the Microsoft® Hot fix. Please refer to the Microsoft® Knowledge Base: http://support.microsoft.com/kb/935448/
Q (Q&A-52|196):
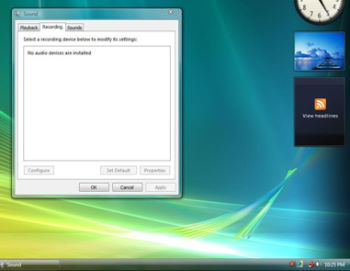
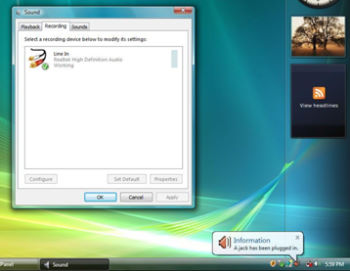
My onboard audio is Realtek HD audio. In the Windows® Vista™, I can't use Sound Recorder to record the audio. What should I do?(2007/3/19)
A:Please refer to below steps to set the audio device.
1.Install Realtek HD Audio driver from motherboard Support CD. Or download the Realtek HD audio driver from ASRock website.
https://www.asrock.com/support/Download.asp
2.Plug in your recording devices (Microphone or other devices) to the Line-in port (or Microphone port), and then the recording device will show up "Line In" (or "Microphone") icon. Please kindly refer to below image. (Control Panel > Sound > Recording)
*Before plug in the recording devices:
*After plug in the recording devices:
3.Reopen the Sound Recorder to record the audio.
Q (Q&A-50|193):
I plugged a headphone in my ASRock motherboard with Realtek HD Audio, and set the "Audio I/O" from "2CH" to "Headphone" in Realtek Audio Manager (picture1).
But the Realtek Audio Manager always recognized my headphone as 2CH speaker after I restarted the operating system (picture2).
What should I do?(2007/1/16)
A:Please refer to the following steps to set up the Realtek Audio Manager correctly.
1.Please remove all audio I/O (Headphones, Speakers, Microphone...) from the motherboard.
2.Please go to Realtek Audio Manager and set the "Audio I/O" you want.
3.Click ok.
4.Please plug your audio I/O back.
5.Restart your system.
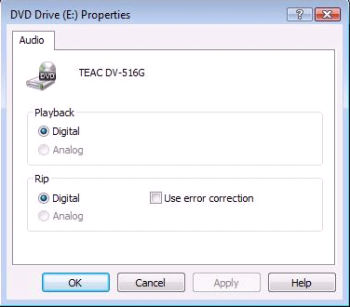
Q (Q&A-50|192):
I would like to use the analog CD-in function in Windows® Vista™. But the "Analog" item of Playback and Rip can not be selected in Windows® Vista™. It was gray. Why? (Here is the screenshot.) (2007/1/16)
A:Windows® Vista™ operating system does not support the analog CD-in. The output of CD/DVD-ROM playback will be digital only.
Q (Q&A-42|172):
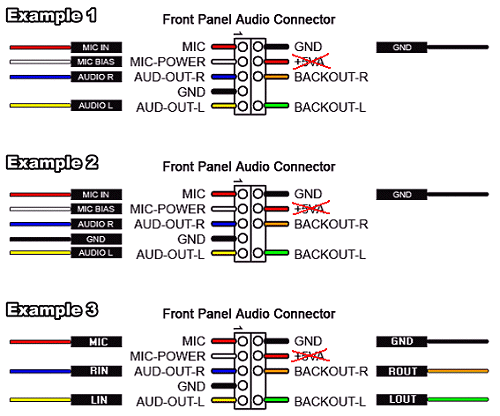
My onboard audio is AC'97 audio. The front panel audio connector cables of my case are different from the description of manual. How should I connect them? Please advice.(2006/4/21)
A:The wording on the front panel connector cables may be different by each chassis manufacturer. Please check the function of each cable. Otherwise it may damage the board if cables are connected to the wrong connectors. We found that if you connect the "GND" (Ground) or "USB VCC" (USB Power) connector pins to the "+5V" pin, it will damage the motherboard after booting up the system. So we recommend you must not install any connector on the +5V pin of the Front Panel Audio header. It will not affect the Audio function if you remove the connector from the +5V pin.
For this reason, we will remove the +5V pin from the Front Panel Audio header of our products in the future.
There are three examples for your reference, please refer to the following pictures.
Q (Q&A-40|164):
If I use AC'97 front audio panel with, how do I connect to the High Definition Audio header on the motherboard and get front audio work?(2006/2/17)
A:If you use AC'97 audio panel, please install it to the front panel audio header as below:
A. Connect Mic_IN (MIC) to MIC2_L.
B. Connect Audio_R (RIN) to OUT2_R and Audio_L (LIN) to OUT2_L.
C. Connect Ground (GND) to Ground (GND).
D. MIC_RET and OUT_RET are for HD audio panel only. You don't need to connect them for AC'97 audio panel.
E. Enter BIOS Setup Utility. Enter Advanced Settings, and then select Chipset Configuration. Set the Front Panel Control option from [Auto] to [Enabled]. For Windows® XP
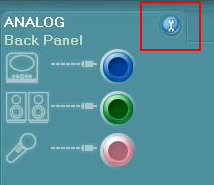
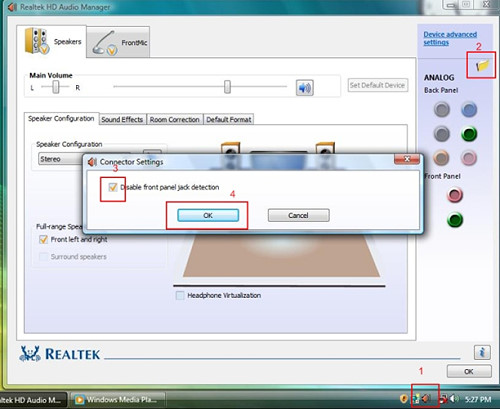
F. Enter Windows® system. Click the icon on the lower right hand taskbar to enter Realtek HD Audio Manager. Click "Audio I/O", select "Connector Settings", choose "Disable front panel jack detection", and save the change by clicking "OK". For Windows® Vista™
F. Enter Windows® system, 1: Double click the icon on the lower right hand taskbar to enter Realtek HD Audio Manager. 2: Click the "Folder" icon at the top-right corner. 3. Check "Disable front panel jack detection". 4. Click "OK".
(Please refer to the following picture)
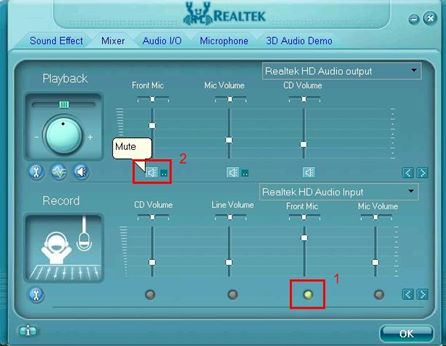
G. To activate the front mic: For Windows® XP:
Please select the Front Mic as default record device in No. 1.
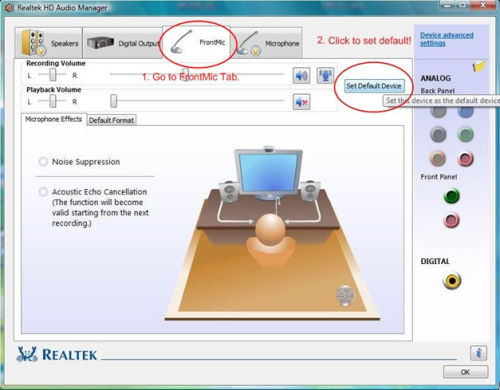
If you want to hear your voice through Front Mic, please deselect "Mute" in No. 2 For Windows® Vista™:
1.Go to the "FrontMic" Tab in the Realtek Control panel.
Click "Set Default Device" to make the Front Mic as the default record device.
Q (Q&A-40|166):
What's the requirement for High Definition Audio to work under Windows® XP 64bit?(2006/2/17)
A:For normal working of High Definition Audio under Windows® XP 64bit, there is a hotfix file provided by Microsoft. Please install the hotfix before installing the audio driver. Otherwise, the audio driver may not be installed successfully.
Please click the link to download the hotfix file:
http://support.microsoft.com/?kbid=901105
Q (Q&A-7|34):
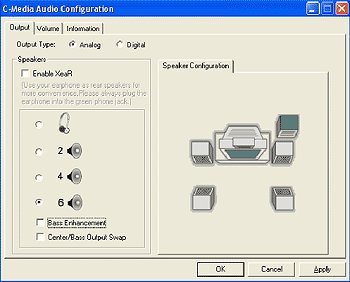
Can I use the microphone if I select 6 speakers in C-Media Audio Configuration?(2003/5/9)
A:If you select 6 speakers in C-Media Audio Configuration for 5.1 CH output, all three audio connectors (Line in, Line out and MIC) are defined as output connectors.
Microphone is an input device. So you are not able to use the microphone at this moment.
Q (Q&A-7|33):
How do I select "Output Type" in C-Media 3D Audio Configuration?(2003/5/9)
A:Please select "Analog" for "Output Device" in C-Media 3D Audio Configuration.
Q (Q&A-2|10):
If I want to use 4/6 speakers, how do I setup 4/6-Channel audio ?(2002/11/26)
A:STEP 1: 4 CH: Connect the front L/R channel to "Line Out", the rear L/R channel to "Line In".
6 CH: Connect the front L/R channel to "Line Out", the rear L/R channel to "Line In", and the Center/Subwoofer channel to "Mic In".
STEP 2:
After installation of C-Media Audio driver, you will find an icon "C-Media Audio configuration" on the taskbar.
STEP 3:
Click the icon, and the screen will show the current audio configuration.
Select "Output" to change your audio configuration. Select "Analog" for Output Type and choose "4 channels" / "6 channels" for your speaker configuration.
 Меню
Меню
 (2008/7/31)
 (2008/6/26)
 (2007/4/20)
 (2007/1/16)